
来源:greyscalegorilla文章源自狐狸影视城-https://fox-studio.net/34308.html
翻译:千年骚狐文章源自狐狸影视城-https://fox-studio.net/34308.html
转载请注明出处。文章源自狐狸影视城-https://fox-studio.net/34308.html
文章源自狐狸影视城-https://fox-studio.net/34308.html
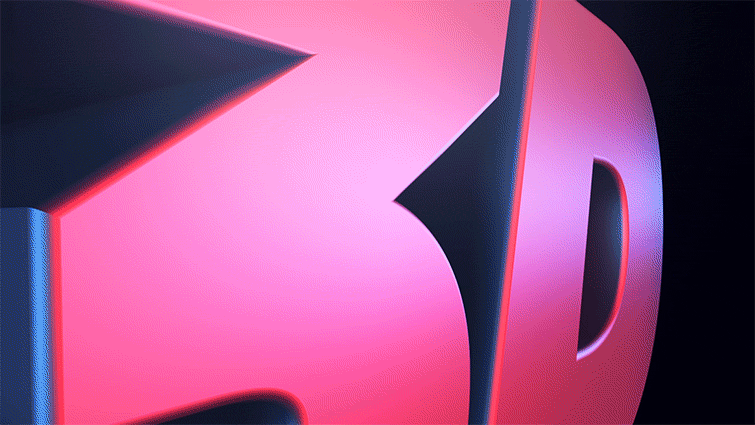
本文将带你学习使用Ae内置的3D功能,渲染出漂亮的立体文字。文章源自狐狸影视城-https://fox-studio.net/34308.html
 文章源自狐狸影视城-https://fox-studio.net/34308.html
工程文件在帖子结尾处下载。文章源自狐狸影视城-https://fox-studio.net/34308.html
文章源自狐狸影视城-https://fox-studio.net/34308.html
1. 创建文本图层
使用文本工具,创建一个文本层,内容随意。推荐使用“大块头”风格的文字字体,比如“Sans-serif”字体。文章源自狐狸影视城-https://fox-studio.net/34308.html
2. 使用Cinema 4D渲染器
我们将使用Cinema 4D渲染器,听起来有点困惑。如果你使用了After Effects cc或以上版本,就会内置Cinema 4D Lite版本。文章源自狐狸影视城-https://fox-studio.net/34308.html
 文章源自狐狸影视城-https://fox-studio.net/34308.html
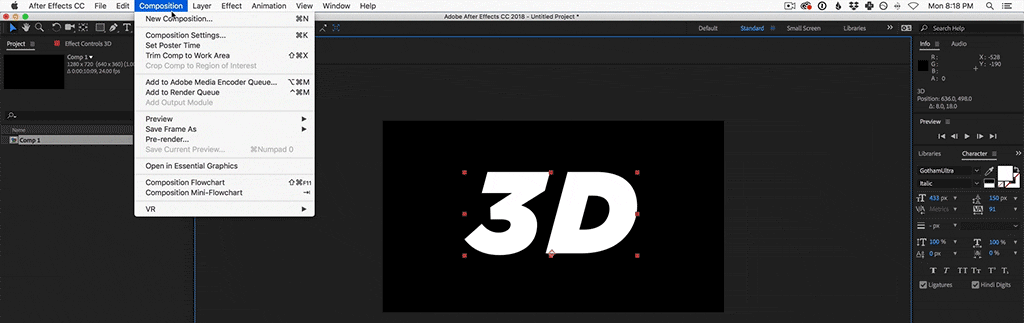
合成(Composition)→ 合成设置(Composition Settings),选择“3D 渲染器”项目,在其中渲染器菜单中,选择“Cinema 4D”渲染器。文章源自狐狸影视城-https://fox-studio.net/34308.html
然后点击“选项(Options)”按钮,在其中设置质量为1(草图),这会让AE更加快速的工作。文章源自狐狸影视城-https://fox-studio.net/34308.html
最后点击确定。文章源自狐狸影视城-https://fox-studio.net/34308.html
3. 创建3D文本层
 文章源自狐狸影视城-https://fox-studio.net/34308.html
激活文本层的3D属性开关。现在文本层可以在三维空间中展现(快捷键W,可以旋转),但是文本层本身还是扁平的。文章源自狐狸影视城-https://fox-studio.net/34308.html
4. 添加文本层的深度(厚度)
 文章源自狐狸影视城-https://fox-studio.net/34308.html
为了得到真实的3D效果,需要给文本添加厚度。打开文本层设置(图层前的倒三角按钮)→ 几何选项(Geometry Options)→ 凸出深度(Extrusion Depth)设置文本深度。文章源自狐狸影视城-https://fox-studio.net/34308.html
5. 给立体文字添加灯光照明
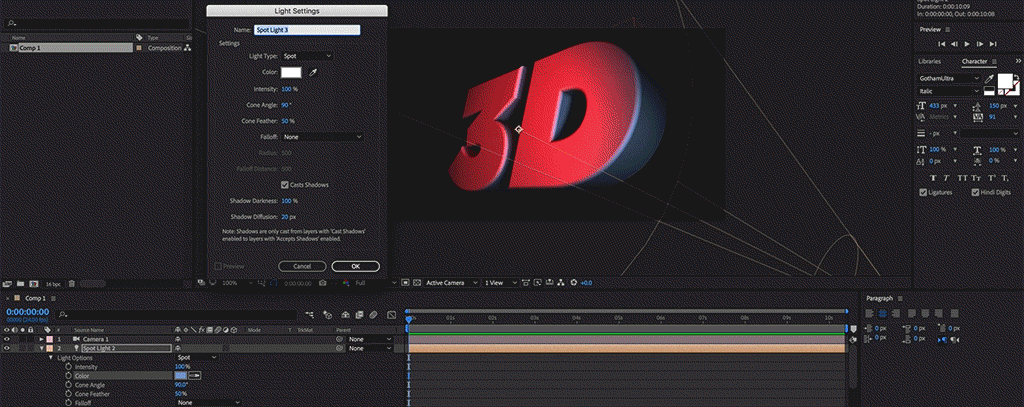
从现在开始,所做的一切都是让立体文字看起来更加真实。灯光和材质是关键,先添加一个聚光灯(Spotlight)。文章源自狐狸影视城-https://fox-studio.net/34308.html
 文章源自狐狸影视城-https://fox-studio.net/34308.html
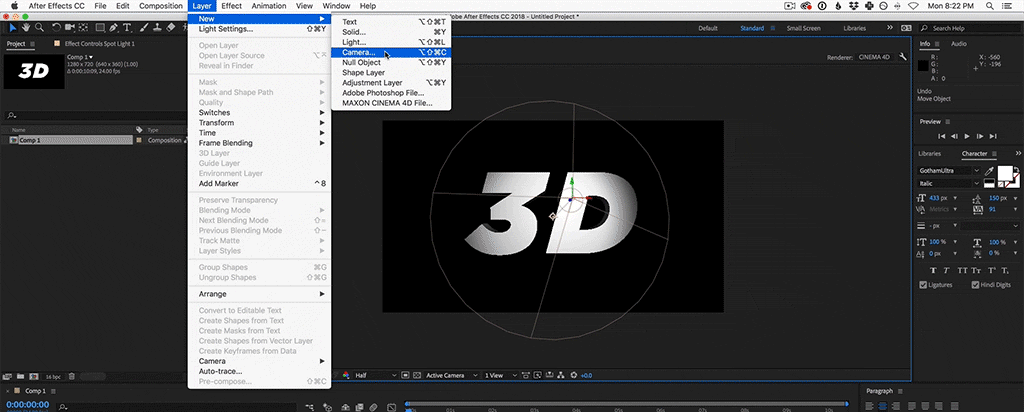
图层(Layer) → 新建(New)→ 灯光(Light)。选择聚光灯(Spot)。文章源自狐狸影视城-https://fox-studio.net/34308.html
使用普通的白色。文章源自狐狸影视城-https://fox-studio.net/34308.html
 文章源自狐狸影视城-https://fox-studio.net/34308.html
调整颜色为白色,强度设置为100%,设置阴影深度100%,并勾选投影。文章源自狐狸影视城-https://fox-studio.net/34308.html
最后点击ok文章源自狐狸影视城-https://fox-studio.net/34308.html
6. 添加摄像机
现在需要为项目添加一个摄像机。文章源自狐狸影视城-https://fox-studio.net/34308.html
 文章源自狐狸影视城-https://fox-studio.net/34308.html
图层 → 新建 → 摄像机,类型为双节点摄像机(Two-Node Camera),对于当前项目,将摄像机焦距设置为30毫米。点击确定。文章源自狐狸影视城-https://fox-studio.net/34308.html
使用快捷键C,操作摄像机。可以平移、旋转和缩放。文章源自狐狸影视城-https://fox-studio.net/34308.html
7. 为立体文字添加倒角
选择文字图层,按两下A键,就可以看到图层的立体设置选项。文章源自狐狸影视城-https://fox-studio.net/34308.html
 文章源自狐狸影视城-https://fox-studio.net/34308.html
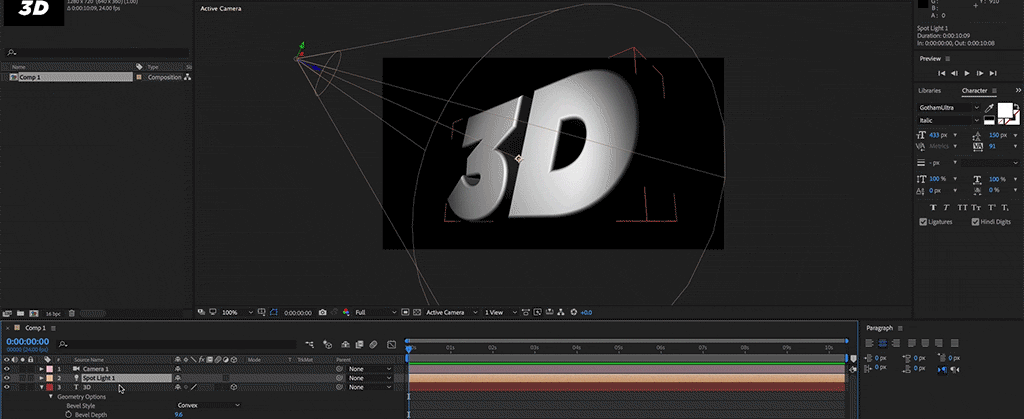
选择斜面/倒角样式(Bevel Style)为凸面(Convex),调整斜面/倒角深度,可获得更大的倒角。让灯光反射在文字倒角上,而不仅仅是照亮平面。文章源自狐狸影视城-https://fox-studio.net/34308.html
8. 复制灯光
 文章源自狐狸影视城-https://fox-studio.net/34308.html
使用Ctrl + D(CMD + D on Mac)复制一个聚光灯。按下P键,打开位置属性设置,调整灯光的位置照亮文字边缘。文章源自狐狸影视城-https://fox-studio.net/34308.html
9. 添加阴影
默认情况下,AE图层不会投射出阴影。文章源自狐狸影视城-https://fox-studio.net/34308.html
 文章源自狐狸影视城-https://fox-studio.net/34308.html
在文本层材质选项下,打开投射阴影的属性。文章源自狐狸影视城-https://fox-studio.net/34308.html
10. 调整灯光颜色
通过灯光的照明颜色,改变立体文字的颜色。文章源自狐狸影视城-https://fox-studio.net/34308.html
 文章源自狐狸影视城-https://fox-studio.net/34308.html
选中第一个聚光灯,按两下A键,打开参数设置。打开灯光颜色的拾色器面板,选择一个喜欢的颜色。在三维中一点颜色也会有很大的帮助。文章源自狐狸影视城-https://fox-studio.net/34308.html
同样的操作,为第二个聚光灯设置颜色,设置一个互补色。文章源自狐狸影视城-https://fox-studio.net/34308.html
11. 添加环境光照
接下来需要为我们的对象创建一个环境光照。文章源自狐狸影视城-https://fox-studio.net/34308.html
图层 → 新建 → 灯光
 文章源自狐狸影视城-https://fox-studio.net/34308.html
选择灯光类型为环境(Ambient),并选择一个颜色,点击ok。不要担心默认结果,我们还没完。文章源自狐狸影视城-https://fox-studio.net/34308.html
 文章源自狐狸影视城-https://fox-studio.net/34308.html
选中环境光,按两次A键,减小灯光强度。在这个案例中,我设置在10%左右。文章源自狐狸影视城-https://fox-studio.net/34308.html
12. 添加边缘光(RimLight)
现在我想给立体文字对象,添加个边缘光。你可以快速的,再一次复制对象前方的聚光灯。文章源自狐狸影视城-https://fox-studio.net/34308.html
 文章源自狐狸影视城-https://fox-studio.net/34308.html
按下p键,调整位置照亮文字的边缘,并且改变灯光的颜色和强度。文章源自狐狸影视城-https://fox-studio.net/34308.html
13. 调整材质高光选项
选中文本层,在材质选项菜单下,调整镜面强度(Specular Intensity)和镜面反光度(Specular Shininess)。文章源自狐狸影视城-https://fox-studio.net/34308.html
 文章源自狐狸影视城-https://fox-studio.net/34308.html
微调整两个参数,会给你带来不错的感觉。文章源自狐狸影视城-https://fox-studio.net/34308.html
14. 创建背景
接下来做最后的调整,先添加一个背景。文章源自狐狸影视城-https://fox-studio.net/34308.html
 文章源自狐狸影视城-https://fox-studio.net/34308.html
图层 → 新建 → 纯色,设置颜色。我是用一个深黑色作为背景颜色,将背景层放在最下方。文章源自狐狸影视城-https://fox-studio.net/34308.html
15. 颜色调整层
几乎完成了,最后添加一个新的调整层。文章源自狐狸影视城-https://fox-studio.net/34308.html
 文章源自狐狸影视城-https://fox-studio.net/34308.html
图层 → 新建 → 调整图层,并将图层放在所有图层的最上方。文章源自狐狸影视城-https://fox-studio.net/34308.html
 文章源自狐狸影视城-https://fox-studio.net/34308.html
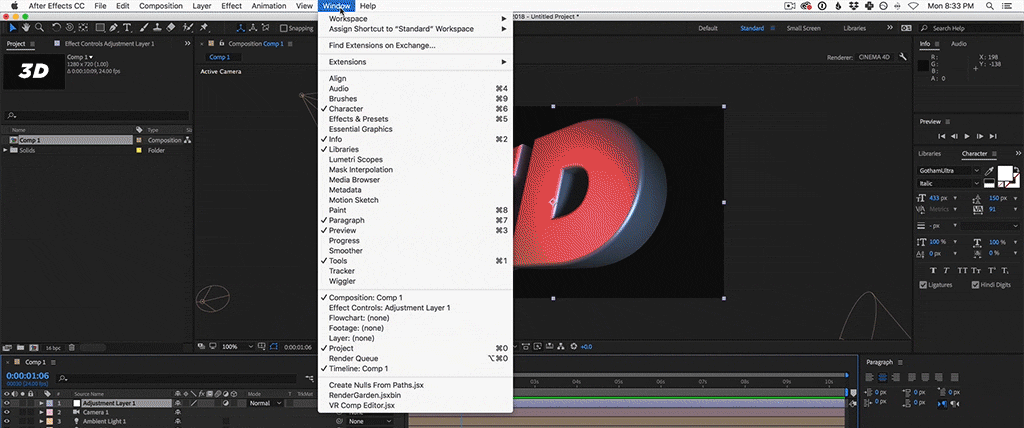
窗口 → 效果&预设,搜索并添加曲线(Curves)到调节层上。文章源自狐狸影视城-https://fox-studio.net/34308.html
在曲线中,调整为S形曲线。或者你也可以对蓝色通道阴影提高一点。文章源自狐狸影视城-https://fox-studio.net/34308.html
16. 动画
做一些简单的动画,让立体文字动起来,更加具有立体感。文章源自狐狸影视城-https://fox-studio.net/34308.html
 文章源自狐狸影视城-https://fox-studio.net/34308.html
文章源自狐狸影视城-https://fox-studio.net/34308.html
文章源自狐狸影视城-https://fox-studio.net/34308.html
工程文件在下发下载。文章源自狐狸影视城-https://fox-studio.net/34308.html
2019年1月24日 下午10:50 1F
老师讲的非常好。内容详尽,重点突出。