
 文章源自狐狸影视城-https://fox-studio.net/28960.html
子主题简介
使用wordpress主题,很多用户对当前使用的主题会有自定义的地方。在原主题修改,当每次父主题更新时都需要重新去修改,而子主题的目的就是即保留了自定义的地方,又不妨碍父主题的更新。当然只是相对的,尤其是对于鸟哥的付费的Begin主题,相对来说还是稍微麻烦一点。文章源自狐狸影视城-https://fox-studio.net/28960.html
通常主题更新是不会大改文件目录结构的,只是鸟哥的主题是付费,为了防止被某些人破解盗卖,所以鸟哥每次大更新都会修改主题的目录结构,这会导致子主题也需要进行匹配。但若是你比较了解子主题的修改,那么相对于每次更新父主题去修改还是方便很多。文章源自狐狸影视城-https://fox-studio.net/28960.html
以上是我使用子主题的目的所在,因为我对主题的自定义修改地方还是比较多的。关于更多子主题的介绍可以去百度。文章源自狐狸影视城-https://fox-studio.net/28960.html
文章源自狐狸影视城-https://fox-studio.net/28960.html
注:以下内容仅对于使用知更鸟的Begin(1.7.1版)主题有效,其他主题使用的朋友请勿留言咨询,因为我也很业余,其他问题回答不了。文章源自狐狸影视城-https://fox-studio.net/28960.html
文章源自狐狸影视城-https://fox-studio.net/28960.html
鸟哥前两天做了一个Begin主题的简洁版begin-pure子主题,购买的朋友在群里都会看到。这里不使用精简版,而是参考子主题的文件进行修改。不赘述理论知识,只介绍方法步骤。文章源自狐狸影视城-https://fox-studio.net/28960.html
文章源自狐狸影视城-https://fox-studio.net/28960.html
创建子主题
Themes文件夹下新建一个文件夹名称随意。我使用“begin-prue”,themes/begin-pure 包含文件有:文章源自狐狸影视城-https://fox-studio.net/28960.html
- style.css(必须)
- screenshot.png(可有可无,主题的展示图片)
style.css中内容如下:文章源自狐狸影视城-https://fox-studio.net/28960.html
- /*
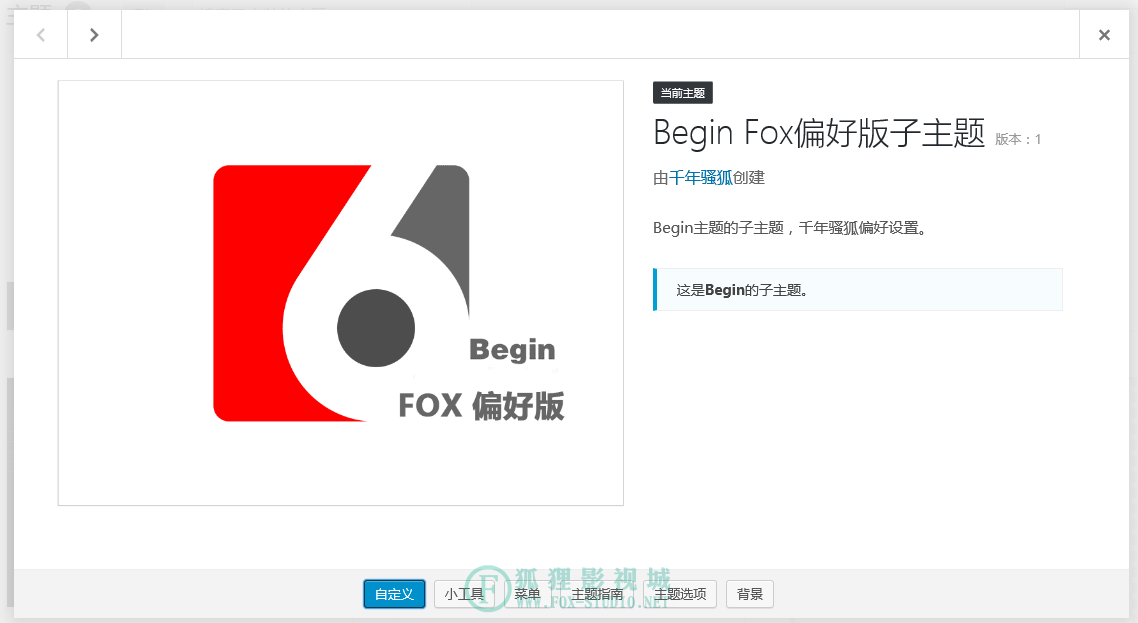
- Theme Name: Begin Fox偏好版子主题
- Theme URI: https://fox-studio.net/28960.html
- Author: 千年骚狐
- Author URI: https://fox-studio.net/
- Description: Begin主题的子主题,千年骚狐偏好设置。
- Template:begin
- Version: 1
- */
- @import url("../begin/style.css");
以上信息显示在主题介绍中文章源自狐狸影视城-https://fox-studio.net/28960.html
 文章源自狐狸影视城-https://fox-studio.net/28960.html
style.css其中最重要的是这一句,关联父主题的。缺少或不正确,子主题无法使用。文章源自狐狸影视城-https://fox-studio.net/28960.html
- Template:begin
在后台外观→主题处,就可以看到新创建的主题了。需要注意的是,启用子主题后,需要重新设置主题选项和小工具,就如同你第一次使用这个主题时一样。文章源自狐狸影视城-https://fox-studio.net/28960.html
下面进行偏好的修改,以下修改均在子主题中进行,不对父主题做任何删改。文章源自狐狸影视城-https://fox-studio.net/28960.html
文章源自狐狸影视城-https://fox-studio.net/28960.html
视频分类缩略图裁剪
此方法治标不治本,详情咨询主题作者。启用子主题后,按以下方法操作。文章源自狐狸影视城-https://fox-studio.net/28960.html
复制Begin根目录下的 taxonomy-videos.php 文件到子主题 begin-prue 目录下。文章源自狐狸影视城-https://fox-studio.net/28960.html
查找 taxonomy-videos.php 中的以下内容,约13行起:文章源自狐狸影视城-https://fox-studio.net/28960.html
- if (zm_get_option('lazy_s')) {
- zm_videos_thumbnail_h();
- } else {
- zm_videos_thumbnail();
- }
修改为文章源自狐狸影视城-https://fox-studio.net/28960.html
- if (zm_get_option('lazy_s')) {
- zm_the_thumbnail_h();
- } else {
- zm_the_thumbnail();
- }
保存后刷新视频页面,效果如下:文章源自狐狸影视城-https://fox-studio.net/28960.html
 文章源自狐狸影视城-https://fox-studio.net/28960.html
文章源自狐狸影视城-https://fox-studio.net/28960.html
图片分类缩略图裁剪
此方法和子主题无关,很简单。复制以下内容:文章源自狐狸影视城-https://fox-studio.net/28960.html
- @media screen and (min-width:999px) {
- .related-site-img {
- height: 131px;
- overflow: hidden;
- }
- .picture-img {
- height: 195px;
- overflow: hidden;
- }
- }
到主题选项→定制风格,自定义样式代码中。保存后刷新图片页面,效果如下:文章源自狐狸影视城-https://fox-studio.net/28960.html
 文章源自狐狸影视城-https://fox-studio.net/28960.html
文章源自狐狸影视城-https://fox-studio.net/28960.html
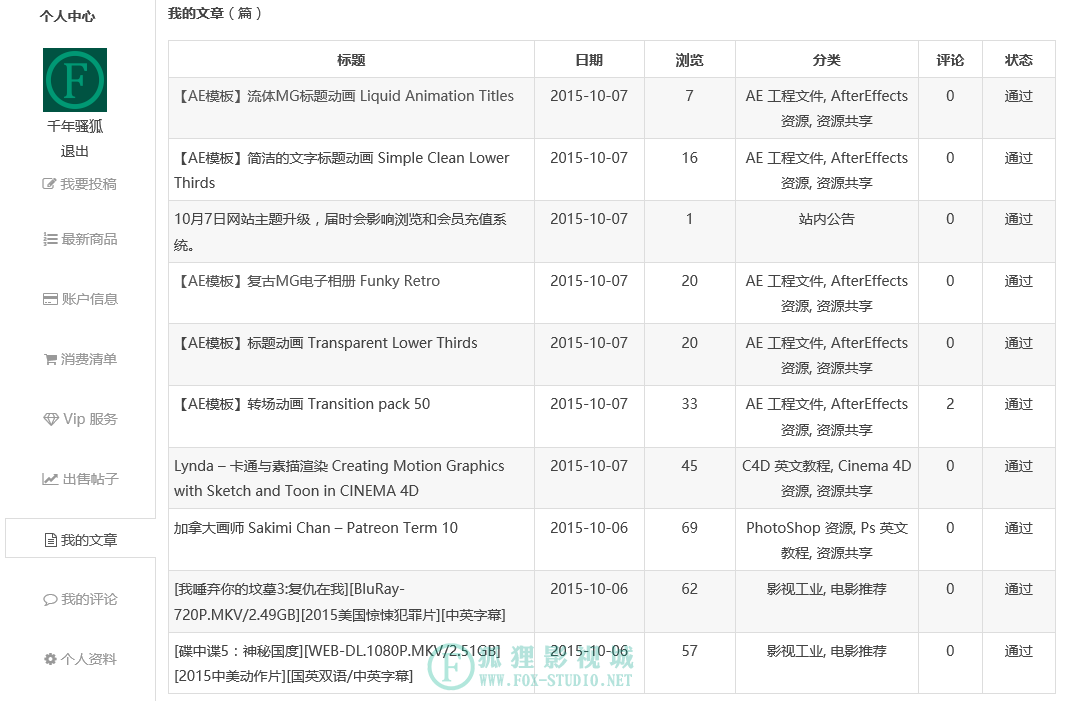
我的文章列表(用户中心)隔行背景
拷贝父主题 begin\inc\user\my-post.php 文件到子主题相同路径下 begin-prue\inc\user\my-post.php 打开文章源自狐狸影视城-https://fox-studio.net/28960.html
方法一,用下方内容替换所有:文章源自狐狸影视城-https://fox-studio.net/28960.html
- <table cellspacing="0" cellpadding="0" border="0">
- <thead>
- <tr>
- <td width="40%">标题</td>
- <td width="12%">日期</td>
- <td width="10%">浏览</td>
- <td width="20%">分类</td>
- <td width="7%">评论</td>
- <td width="8%">状态</td>
- </tr>
- </thead>
- <tbody>
- <?php
- $userinfo=get_userdata(get_current_user_id());
- $user_id= $userinfo->id;
- $paged = (get_query_var('paged')) ? get_query_var('paged') : 1;
- $args = array(
- 'post_type' => array('post','video','picture','bulletin','tao'),
- 'author' => $user_id,
- 'posts_per_page' =>'10',
- 'post_status' => array('publish', 'pending'),
- 'orderby' => 'date',
- 'paged' => $paged
- );
- query_posts($args);
- if(have_posts()) : while (have_posts()) : the_post();
- switch(get_post(get_the_ID())->post_status){
- case 'publish':
- $status='通过';
- break;
- case 'pending':
- $status='<span>待审</span>';
- break;
- }
- $color_z = '';
- $zhiz = $i%2;
- ($zhiz == '1') ? $color_z ="#ffffff": $color_z = "#f7f7f7";
- echo "<tr bgcolor=$color_z>\n";
- ?>
- <td><?php the_title( sprintf( '<a href="%s" rel="bookmark">', esc_url( get_permalink() ) ), '</a>' ); ?></td>
- <td class="tc"><?php the_time( 'Y-m-d' ) ?></td>
- <td class="tc"><?php if( function_exists( 'the_views' ) ) { print ''; the_views(); print ''; } ?></td>
- <td class="tc"><?php echo get_the_term_list(get_the_ID(), array('category','videos','gallery','notice','taobao'), '', ', ', ''); ?></td>
- <td class="tc"><?php echo get_post(get_the_ID())->comment_count?></td>
- <td class="tc"><?php echo $status?></td>
- <?php
- echo "</tr>";
- $i++;
- endwhile; endif;?>
- </tbody>
- </table>
- <?php pagenavi(); ?>
- <div class="clear"></div>
文章源自狐狸影视城-https://fox-studio.net/28960.html
方法二,添加所需代码。查找下方内容,约26行起:文章源自狐狸影视城-https://fox-studio.net/28960.html
- if(have_posts()) : while (have_posts()) : the_post();
- switch(get_post(get_the_ID())->post_status){
- case 'publish':
- $status='通过';
- break;
- case 'pending':
- $status='<span>待审</span>';
- break;
- }
在此处下方添加:文章源自狐狸影视城-https://fox-studio.net/28960.html
- $color_z = '';
- $zhiz = $i%2;
- ($zhiz == '1') ? $color_z ="#ffffff": $color_z = "#f7f7f7";
- echo "<tr bgcolor=$color_z>\n";
然后删除下方的内容:文章源自狐狸影视城-https://fox-studio.net/28960.html
- <tr>
接着查找如下内容:文章源自狐狸影视城-https://fox-studio.net/28960.html
- <?php endwhile; endif;?>
替换为:文章源自狐狸影视城-https://fox-studio.net/28960.html
- <?php
- echo "</tr>";
- $i++;
- endwhile; endif;
- ?>
完成,保存后刷新用户中心,我的文章列表如下图:文章源自狐狸影视城-https://fox-studio.net/28960.html
 文章源自狐狸影视城-https://fox-studio.net/28960.html
文章源自狐狸影视城-https://fox-studio.net/28960.html
待续……
以上是大家都可以用的地方,我自己还使用了其他插件在用户中心添加了前端,不适用与Begin的其他用户。也就不写了。日后有新的地方再编辑此页面。文章源自狐狸影视城-https://fox-studio.net/28960.html
文章源自狐狸影视城-https://fox-studio.net/28960.html

2016年2月15日 下午4:49 2F
我用知更鸟的begin主题, 整个网站都反映非常的慢, 请问您知道是什么原因吗?
2016年2月15日 下午9:11 B1
@ wanzhou 具体问题具体分析,和网站程序与服务器都有关。你可以考虑换成wp的默认主题,测试服务器的速度,再确定是主题程序的问题。
不过同样的主题,我用的就很好。
2016年2月17日 上午9:42 B2
@ 千年骚狐 嗯嗯, 我还是换成知更鸟Ality主题了, 速度非常快. 谢谢你啦
2015年10月8日 下午12:10 1F
其实只要一句CSS就可以扩定隔行变色:
table tr:nth-child(odd){background:#f8f8f8;}
2015年10月8日 下午1:50 B1
@ 知更鸟 嘿嘿,css不太懂,当时百度就找到这个,能套进去就已经很高兴了! <img src="\" />